
NotionみたいなフィルターUI作る【core編】
Notion を業務でも使いますが、データベースのフィルターが便利です。常にプレビューしてくれているし、変えたい時・追加したい時もシンプルな操作で対応できます。
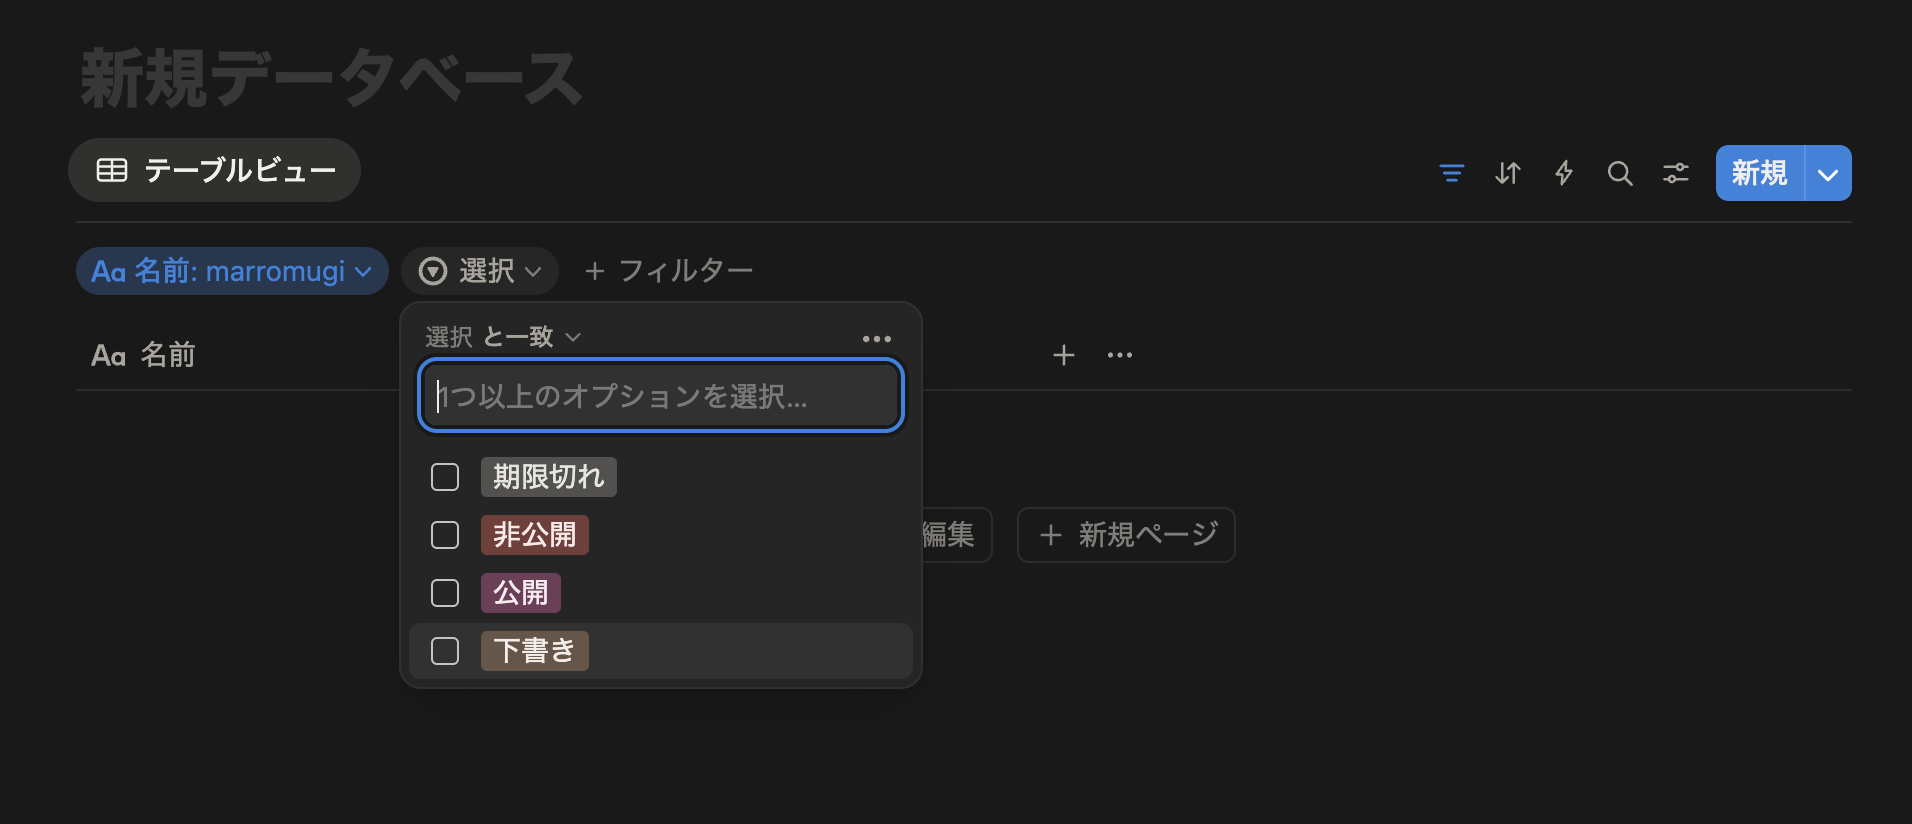
今回はそのフィルターを型安全に構築するために、TypeScriptで型とユーティリティの実装をしていきます。
先にインターフェースの完成図を
今回はフィルターのスキーマを定義し、そのスキーマをもとにフィルターのUIを構築していくイメージで実装を進めてきます。 スキーマの定義は以下のような形で実装します。
export const sampleSchema = {
email: createFieldHelper.text({
label: 'Email',
description: 'アカウントのメールアドレスを設定してください',
validate: (value: string) => {
const emailRegex = /^[^\s@]+@[^\s@]+\.[^\s@]+$/;
if (!emailRegex.test(value)) {
return { result: false, message: 'Please enter a valid email address' };
}
return { result: true };
},
}),
status: createFieldHelper.select<'active' | 'inactive' | 'pending'>({
label: 'Status',
description: 'アカウントのステータスを設定してください',
disabled: false,
options: [
{ label: 'アクティブ', value: 'active' },
{ label: '無効', value: 'inactive' },
{ label: '認証待ち', value: 'pending' },
],
}),
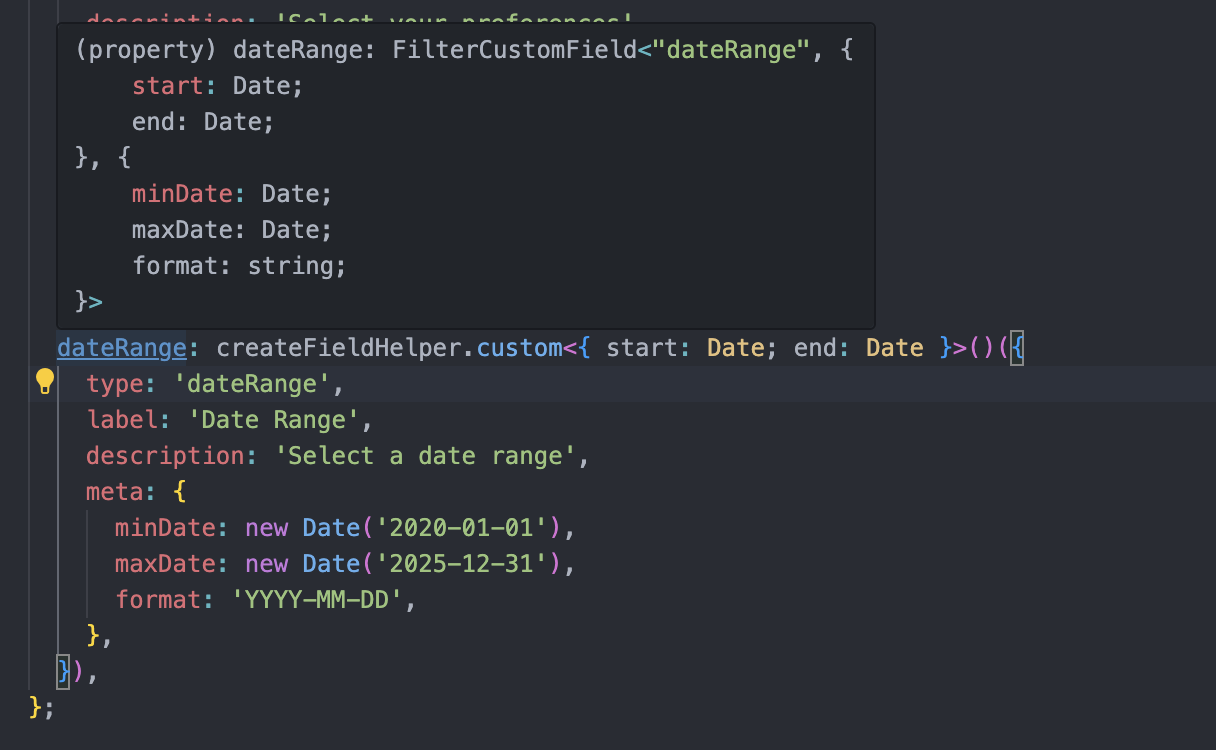
dateRange: createFieldHelper.custom<{ start: Date; end: Date }>()({
type: 'customDateRange', // 任意のタイプも設定できる
label: 'Date Range',
description: 'アカウントの有効期間を設定してください',
meta: {
minDate: new Date('2020-01-01'),
maxDate: new Date('2025-12-31'),
format: 'YYYY-MM-DD',
},
}),
}
const allFields = getAllFields(sampleSchema); // 全フィールドを配列で取得
const field = getField(sampleSchema, 'customDateRange'); // 特定のフィールドを取得
type SampleFilterSchema = typeof sampleSchema;
/**
* type SampleFilterValues = {
email?: string | undefined;
status?: "active" | "inactive" | "pending" | undefined;
dateRange?: {
start: Date;
end: Date;
} | undefined;
}
*/
type SampleFilterValues = FilterValue<SampleFilterSchema>;
/**
* type SampleFilterTypes = "text" | "select" | "customDateRange"
*/
type SampleFilterTypes = FilterType<SampleFilterSchema>;ベースの型定義
ベースフィールド
まずはスキーマの型を実装します。とりあえず各スキーマのフィールドで共通に使用しそうなパラメータをとして定義します。
type FilterBaseField<T> = {
  type: string; // override with union type
  label: string;
  description?: string;
  disabled?: boolean;
  _value?: T; // parameter to get value type
};
んー _value がちょっといけてない気もしますが、実装をシンプルにするためにもこのままでいきます。
それぞれ以下の用途で使います。
| パラメータ | 詳細 |
|---|---|
type | どのフィルターUIを出すか判定するために使用 |
disabled | 「このフィルターは表示させたくない!」という際に設定 |
label | UIに表示する用 |
disabled | UIに表示する用 |
_value | 型上でフィールドの型を取得するための型 |
FilterBaseField を継承して、いくつかフィールドを作ってみます。とりあえず使いそうな text / select / radio / check の4つを定義してみました。
export type FilterTextField = FilterBaseField<string> & {
  type: 'text';
  validate?: (value: string) => { result: true } | { result: false; message: string };
};

export type FilterSelectField<T> = FilterBaseField<T> & {
  type: 'select';
  options: { label: string; value: T }[];
};

export type FilterRadioField<T> = FilterBaseField<T> & {
  type: 'radio';
  options: { label: string; value: T }[];
};

// eslint-disable-next-line @typescript-eslint/no-explicit-any
export type FilterCheckField<T extends Array<any>> = FilterBaseField<T> & {
  type: 'check';
  options: { label: string; value: T[number] }[];
};文字列のバリデーションや選択系のoptions など必要そうなパラメータをそれぞれ追加していきます。
カスタムフィールド
こんな感じで定義していけばそれぞれに合ったフィールドを定義できますが、便利な型としてカスタム用のフィールドの方も作ってみます。
export type FilterCustomField<
  Type extends string,
  Value,
  Meta extends Record<string, unknown>,
> = Omit<FilterBaseField<Value>, 'type'> & {
  type: Type;
  meta: Meta;
};カスタムの場合、Type / Value / Meta の3つのジェネリクスを設けています。
それぞれ以下のような使い道です。
| ジェネリクス | 詳細 |
|---|---|
Type | type の値 |
Value | このフィールドが持つデータの型 |
Meta | 任意のパラメータや関数用のオブジェクト |
スキーマ・バリュー
これらの型を使ってスキーマの型を定義してみます。 関数の引数にスキーマを設定したい時とかに使用する想定です。 ついでにスキーマから取得できる値の型も取得できるようにしてみます。
export type FilterField =
  | FilterTextField
  | FilterSelectField<unknown>
  | FilterRadioField<unknown>
  | FilterCheckField<unknown[]>
  | FilterCustomField<string, unknown, Record<string, unknown>>;

export type FilterSchema = Record<string, FilterField>;

export type FilterValue<T extends FilterSchema> = Partial<{
  [key in keyof T]: T[key]['_value'];
}>;

export type FilterType<T extends FilterSchema> = T[keyof T]['type'];

// 例
type SampleFilterSchema = typeof sampleSchema; // 冒頭のスキーマ

/**
 * type SampleFilterValues = {
    email?: string | undefined;
    status?: "active" | "inactive" | "pending" | undefined;
    dateRange?: {
        start: Date;
        end: Date;
    } | undefined;
}
 */
type SampleFilterValues = FilterValue<SampleFilterSchema>;

// type SampleFilterTypes = "text" | "select" | "customDateRange"
type SampleFilterTypes = FilterType<SampleFilterSchema>;
フィールドを作成するヘルパーを実装
現状でも以下のように実装することでスキーマの定義ができます。
const schema = {
  email: {
    type: 'text',
    label: 'Email',
    description: 'Enter your email address',
    validate: (value: string) => {
      const emailRegex = /^[^\s@]+@[^\s@]+\.[^\s@]+$/;
      if (!emailRegex.test(value)) {
        return { result: false, message: 'Please enter a valid email address' };
      }
      return { result: true };
    },
    // _value: string // 定義しなくても問題ないが、定義はできる & エディタ側の予測変換で出てくる
  } satisfies FilterTextField
} satisfies FilterSchema;
ですが、
実装者側で定義しない
_valueが見えてしまう毎回
typeを書かないといけないので冗長(FilterTextFieldを指定した時点でtypeが text なのは自明)
という2点から、可能であればこの2つのパラメータはよしなに勝手に追加してくれるほうが、よりわかりやすくなりそうです。 今回はヘルパー関数を実装して、その課題を解決します。
ベースフィールドのヘルパー
export type FilterFieldConfig<T extends FilterField> = Omit<T, 'type' | '_value'>;

export const createFieldHelper = {

  text: (config: FilterFieldConfig<FilterTextField>): FilterTextField => ({
    type: 'text',
    ...config,
  }),

  select: <T = string>(config: FilterFieldConfig<FilterSelectField<T>>): FilterSelectField<T> => ({
    type: 'select',
    ...config,
  }),

  radio: <T = string>(config: FilterFieldConfig<FilterRadioField<T>>): FilterRadioField<T> => ({
    type: 'radio',
    ...config,
  }),

  check: <T = string>(config: FilterFieldConfig<FilterCheckField<T[]>>): FilterCheckField<T[]> => ({
    type: 'check',
    ...config,
  }),
};
上で説明した _value と type はカスタムフィールド以外は、実装者側から見えないように除外します。
合わせて除外する用の型 FilterFieldConfig を定義してそれを各フィールドの引数に渡しておきます。
すると以下のような感じに実装できます。
const schema = {
  email: createFieldHelper.text({
    label: 'Email',
    description: 'Enter your email address',
    validate: (value: string) => {
      const emailRegex = /^[^\s@]+@[^\s@]+\.[^\s@]+$/;
      if (!emailRegex.test(value)) {
        return { result: false, message: 'Please enter a valid email address' };
      }
      return { result: true };
    },
  })
} satisfies FilterSchema;
前よりもちょっとだけスッキリしました。
typeを定義しなくても良いsatisfiesなどで型を指定しなくてもエディタの推論が効く
などのメリットがあって良きです。
カスタムフィールドのヘルパー
カスタムフィールドだけは少し特殊な書き方をしています。
カスタムフィールドはどの型を _value として持つのかをジェネリクス経由で渡してあげる必要があります。
そこで以下のように定義できます。
export const createFieldHelper = {

  custom:
    <Value, Type extends string,  Meta extends Record<string, unknown>>(config: {
      type: Type;
      label: string;
      description?: string;
      disabled?: boolean;
      meta?: Meta;
    }): FilterCustomField<Type, Value, Meta> =>
      ({
        ...config,
        meta: config.meta ?? {},
      }) as FilterCustomField<Type, Value, Meta>,
};
この定義もいいのですが、微妙ポイントがあります。それはジェネリクスに定義している3つの型を全て定義してあげる必要がある点です。
可能であれば、Meta と Type は custom の引数から自動的に推論して欲しいです。この問題を解決するために、少し違和感はありますが今の実装をラップして Value のみをジェネリクスに取る関数を作成します。
export const createFieldHelper = {

  custom:
    <Value = unknown>() =>
    <Type extends string, Meta extends Record<string, unknown>>(config: {
      type: Type;
      label: string;
      description?: string;
      disabled?: boolean;
      meta?: Meta;
    }): FilterCustomField<Type, Value, Meta> =>
      ({
        ...config,
        meta: config.meta ?? {},
      }) as FilterCustomField<Type, Value, Meta>,
};
このようにしてあげれば、Value をジェネリクスで取りつつ、Type と Meta は引数から勝手に推論してくれるようにすることができます。 使い方としては以下のような感じです。
const schema = {

  dateRange: createFieldHelper.custom<{ start: Date; end: Date }>()({
    type: 'dateRange',
    label: 'Date Range',
    description: 'Select a date range',
    meta: {
      minDate: new Date('2020-01-01'),
      maxDate: new Date('2025-12-31'),
      format: 'YYYY-MM-DD',
    },
  })
} satisfies FilterSchema
推論を見てみると、下のようにジェネリクスに Type と Meta がちゃんと渡されていることを確認できます。
フィールドを取得するユーティリティを実装
スキーマから特定のフィールドを取得したり、全体を配列として取得したいニーズは少なからずありそうなので実装していきます。 インターフェースとしては以下のような感じです。
スキーマ全体のフィールドを配列で取得する
getAllFields特定のフィールドを取得する
getField
の2つを定義します。
const allFields = getAllFields(sampleSchema);
const field = getField(sampleSchema, 'dateRange');
配列で取得する際は、各フィールドのキーも取得したくなると思います。配列で回している時に id 起因で処理を変えたりしたいケースがあるはず。 そこで、既存のフィールドに対して id も含んだ型を定義しておきます。
export type IdentifiableFilterField<
  T extends FilterField = FilterField,
  K extends string = string,
> = {
  id: K;
} & T;
OKです。まずは getField を実装してみます。
getFields
export function getField<S extends FilterSchema, K extends keyof S & string>(
  schema: S,
  key: K,
): IdentifiableFilterField<S[K], K> {
  return {
    id: key,
    ...schema[key],
  };
}
K が keyof S & string となっているのは、number など他の型を許容しないためです。FilterSchema は Record<string, FilterField> と定義しているため string 以外設定できないように定義しているはずなのですが、なぜか number とかも取れてしまうようでそれを対策するために & string を追加しています、
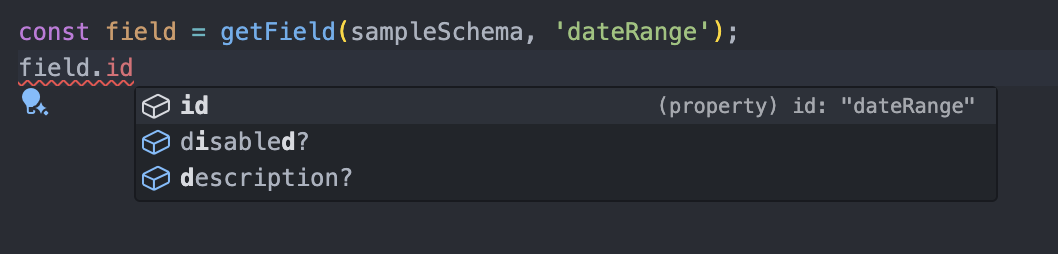
⬆ id がしっかりリテラルになっていて良きです
最後に getAllFields の実装をしていきます。
getAllFields
export function getAllFields<S extends FilterSchema>(
  schema: S,
): {
  [K in keyof S]: IdentifiableFilterField<S[K], K & string>;
}[keyof S][] {
  return Object.keys(schema).map((key) => getField(schema, key));
}
返り値が少しわかりにくいですが、これは id を指定した時にどのフィールドなのかを判別できるようにするための実装です。 以下のように実装すると、id で分岐をかけた時に何のフィールドかが取れません。
export function getAllFields<S extends FilterSchema>(
  schema: S,
): IdentifiableFilterField<S[keyof S], keyof S & string>[] {
  return Object.keys(schema).map((key) => getField(schema, key));
}

export const schema = {
  email: createFieldHelper.text({
    label: 'Email',
    description: 'アカウントのメールアドレスを設定してください',
    validate: (value: string) => {
      const emailRegex = /^[^\s@]+@[^\s@]+\.[^\s@]+$/;
      if (!emailRegex.test(value)) {
        return { result: false, message: 'Please enter a valid email address' };
      }
      return { result: true };
    },
  }),

  status: createFieldHelper.select<'active' | 'inactive' | 'pending'>({
    label: 'Status',
    description: 'アカウントのステータスを設定してください',
    disabled: false,
    options: [
      { label: 'アクティブ', value: 'active' },
      { label: '無効', value: 'inactive' },
      { label: '認証待ち', value: 'pending' },
    ],
  }),
}

const fields = getAllFields(schema)

for (const field of fields) {
  if (field.id === "email") {
    const {result} = field.validate() // Error: Property 'validate' does not exist on type...
  }
}
これを解消するために、
キー別にフィールドをマッピング
マッピングしたフィールドを取得して配列に格納
という手順を踏むことで、id をもとにフィールドを判別することができるようになります。
export function getAllFields<S extends FilterSchema>(
  schema: S,
): {
  [K in keyof S]: IdentifiableFilterField<S[K], K & string>;
}[keyof S][] {
  return Object.keys(schema).map((key) => getField(schema, key));
}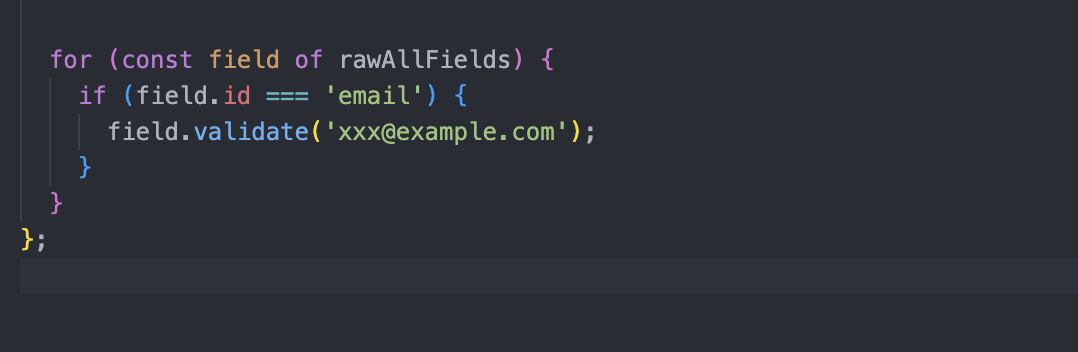
⬆ id で分岐して中身が取得できました
おわり
今回はフィルターUIの型周りの実装をしていきました。 これがあれば、定義したスキーマからUIを表示したり、フィルターの設定値を取得したり、ある程度のことができると思います。 今後の記事では、この型・ユーティリティを使って React でコンポーネントの実装をしてみます。 ご覧いただきありがとうございました🙏
記事一覧に戻る